2020/08/26

【Python】img2pdfを使って複数画像をPDFに変換する

前回からだいぶ時間が経ちましたが、目標である「漫画などの固定レイアウトEpubを目次付きPDFに変換するプログラムを作る」を達成するため、今回は前段階として、Pythonで連番を付けた複数画像ファイルをPDFに変換する方法を検討しました。

PythonのPDF関連のライブラリは、多い様で、PyPDF2ReportLabなどを使用した例の記事が多数ヒットしますが、これらのライブラリの更新はしばらく行われていない様です。

img2pdf

最近、img2pdfというライブラリが手軽かつ画像の再変換無しに使えるということで、日本語の紹介記事が多数書かれています。img2pdfでは、pdfの処理にpikepdfpdfrwが用いられている様です。またpikepdfは、Python3.8にも対応するなど積極的に更新されています。

参考リンク


ただ、簡単に変換するという目的以外の細かい設定を解説しているサイトが見つからなかったので、少し細かい設定を試してみました。
画像ファイルは、左からゼロ埋めしたファイル名になったもの(001.png, 002.png, ...)を使用しました。
img2pdfを用いてタイトル、作成者、およびキーワードなどのプロパティを設定したPDFが作成可能です。

また、見開きや表示倍率、フルスクリーン表示などの設定もできます。

img2pdf *.png -o output.pdf --viewer-magnification 'fit' --viewer-page-layout 'twocolumnright'
view raw img2pdf_cli hosted with ❤ by GitHub
img2pdfをコマンドラインから使う際は、見開きなどの設定ができますが、img2pdf(version 0.4.0)のconvert関数を使うと上手くいかず手こずりました。

import os
import img2pdf
pdfFileName = "output.pdf"
path = "(作業フォルダのパス)"
ext = ".png"
os.chdir(path)
file_list = [i for i in os.listdir(path) if i.endswith(ext)]
with open(pdfFileName, "wb") as f:
f.write(img2pdf.convert(sorted(file_list), title='Test PDF', viewer_page_layout=img2pdf.parse_layout('twocolumnright')))
上記の通り、parse_layout関数を通すなどすると動きました。
恐らくバグだと思いますが誰もこの機能を使っていない為、指摘されていないのかも知れません。

問題点:TwoPageRight、TwoPageLeftに対応していない

ページレイアウトは、現在(img2pdf version 0.4.0)では
single:「単一ページ」に相当
onecolumn:「連続ページ」に相当
twocolumnright:「連続見開きページ(表紙)」に相当
twocolumnleft:「連続見開きページ」に相当
にしか対応していません。

img2pdf.py(「PageLayout」に関する部分)を少し書き換えれば、
TwoPageRight: 「見開きページ(表紙)」に相当
TwoPageLeft: 「見開きページ」に相当
にも対応されることができます。

問題点:R2L (右綴じ)に対応していない


pdfrwは対応している様なので、こちらとの併用が必要になるかと思います。

追記:2022/12/09
pikepdfで右綴じ変換のプログラムを作成されている方がいらっしゃったので、リンクを貼ります。

続き

2020/08/17

【Python】Google People API でGoogle連絡先と住所録CSVを同期する

前々回前回とサラミした記事になってしましましたが、Google People APIを使って住所録のcsvをGoogle連絡先に同期するプログラムが完成したので公開します。
これまで作成したコードを利用していますので、仕様が分からない時は、これまでの記事を参照下さい。

sample.csvについて

Fake Name Generator疑似個人情報データ生成サービスで作成した偽個人情報です。
たまたま実在する人物になっている可能性は低いと思いますが、利用の際はご留意ください。
Google CSV形式に近づけてありますが、微妙に間違っているかもしれません。create_contact_bodyの関数を弄れば、好きなCSV形式に対応できます。

同期方法について

userDefinedに修正日と住所録内のidを設定することで、更新差分を判定しています。

問題点:credentials.jsonの流用

credentials.jsonがQuickstart.pyのものを流用したプログラムとなっているので、アプリケーション名などが正しく設定できていません。今後、設定の仕方が分かれば更新したいと思います。
とりあえず動かす分には現状で問題ないはず...

【関連記事】

2020/06/20

【Python】Google People API でGoogle連絡先の追加/削除する

前回に引き続き、Google People APIを触ってみます。
会社のデータベースや年賀状作成ソフトから出力した住所録のcsvをGoogle連絡先に同期させることを目標として設定しました。
本記事では、csvのファイルを読み込んで、Google連絡先に追加する部分を作成したので公開します。

住所録のcsvファイルの構成は、色々あるかと思いますが、Google連絡先からエクスポートされる際にも使用されているGoogle CSV 形式に事前に合わせてあると仮定して、プログラムを作成します。

Google CSV 形式について

Google CSV形式は恐らく以下のような構成になっているかと思います。

各列名各列の説明
Name氏名
Given Name
Additional Nameミドルネームなど
Family Name
Yomi Name氏名のよみがな
Given Name Yomi名のよみがな
Additional Name Yomiミドルネームなどのよみがな
Family Name Yomi姓のよみがな
Name Prefix敬称(名前の前);Mr.やMrs.、Dr.など
Name Suffix敬称(名前の後);様、先生など
Initialsイニシャル
Nicknameニックネーム
Short Nameショートネーム
Maiden Name旧姓
Birthday誕生日
Gender性別
Location
Billing Information請求情報
Directory Server
Mileage
Occupation職業
Hobby趣味
Sensitivity
Priority
Subject
Notesメモ
Language言語
Photo
Group Membershipグループ
E-mail 1 - TypeE-mail 1の種類;Home、Work、Mobileなど
E-mail 1 - ValueE-mail 1のアドレス
E-mail 2 - TypeE-mail 2の種類;Home、Work、Mobileなど
E-mail 2 - ValueE-mail 2のアドレス
Phone 1 - TypePhone 1の種類;Home、Work、Mobileなど
Phone 1 - ValuePhone 1の電話番号
Phone 2 - TypePhone 2の種類;Home、Work、Mobileなど
Phone 2 - ValuePhone 2の電話番号
Phone 3 - TypePhone 3の種類;Home、Work、Mobileなど
Phone 3 - ValuePhone 3の電話番号
Address 1 - TypeAddress 1の種類;Home、Workなど
Address 1 - FormattedAddress 1の住所
Address 1 - StreetAddress 1の番地・区画
Address 1 - CityAddress 1の市町村
Address 1 - PO BoxAddress 1の私書箱
Address 1 - RegionAddress 1の都道府県
Address 1 - Postal CodeAddress 1の郵便番号
Address 1 - CountryAddress 1の国
Address 1 - Extended AddressAddress 1のアパートの部屋番号など
Address 2 - TypeAddress 2の種類;Home、Workなど
Address 2 - FormattedAddress 2の住所
Address 2 - StreetAddress 2の番地・区画
Address 2 - CityAddress 2の市町村
Address 2 - PO BoxAddress 2の私書箱
Address 2 - RegionAddress 2の都道府県
Address 2 - Postal CodeAddress 2の郵便番号
Address 2 - CountryAddress 2の国
Address 2 - Extended AddressAddress 2のアパートの部屋番号など
Organization 1 - TypeOrganization 1の種類;会社、学校など
Organization 1 - NameOrganization 1の名前
Organization 1 - Yomi NameOrganization 1のよみがな
Organization 1 - TitleOrganization 1での役職
Organization 1 - DepartmentOrganization 1での部署
Organization 1 - Symbol
Organization 1 - LocationOrganization 1の場所
Organization 1 - Job DescriptionOrganization 1での仕事内容
Custom Field 1 - Typeカスタムフィールド(自由に設定可能な領域)
Custom Field 1 - Valueカスタムフィールド(自由に設定可能な領域)
参考:http://googleapis.github.io/google-api-python-client/docs/dyn/people_v1.people.html#createContact

と以上の様に多くの情報が、Google連絡先には登録可能です。
人によっては列の項目がこれよりも多かったりするかも知れませんが、上記の場合のcsvを、インポートするプログラムを組みます。
上記のカスタムフィールドは同期させる時に必要な「修正日」や「住所録内でのID」などを想定しています。
また、CP932やShift_JISで保存されたcsvを想定していません。事前に他のプログラムで処理してあるものとします。

問題点:削除用のバッチ処理コードが実装されていない


一時的に削除用のグループを作成して、そこに削除したい全てのメンバーを移動し、一時的なグループごと削除するという方法が掲示されていました。

しかし、contactGroups.members.modifyでは、連絡先全体(people/me)を指定することができない様なので、結局は、逐次のグループ移動処理が必要になると思います。

前回作成したコードを一部流用して作成したのが以下のものです。

作成したコード

必要なファイル:credentials.json、contacts.csv

import csv
import time
import pickle
import os.path
from googleapiclient.discovery import build
from google_auth_oauthlib.flow import InstalledAppFlow
from google.auth.transport.requests import Request
CONTACT_CSV_FILE = 'googlecontacts.csv'
# If modifying these scopes, delete the file token.pickle.
SCOPES = ['https://www.googleapis.com/auth/contacts']
CLIENT_SECRET_FILE = 'credentials.json'
class ImportContacts(object):
def read_contacts(self, file_name):
# Import the csv file of the address book and convert it into a list
with open(file_name, 'r') as f:
csv_reader = csv.reader(f)
csv_header = next(csv_reader) # Skip the header line
csv_contacts = []
for csv_contact in csv_reader:
csv_contacts.append(csv_contact)
return csv_contacts
def print_all_contacts(self, file_name):
csv_contacts = self.read_contacts(file_name)
for i, csv_contact in enumerate(csv_contacts):
print('no.%s %s' % (i+1, csv_contact))
class QuickstartMod(object):
def __init__(self):
creds = None
# The file token.pickle stores the user's access and refresh tokens, and is
# created automatically when the authorization flow completes for the first time.
if os.path.exists('token.pickle'):
with open('token.pickle', 'rb') as token:
creds = pickle.load(token)
# If there are no (valid) credentials available, let the user log in.
if not creds or not creds.valid:
if creds and creds.expired and creds.refresh_token:
creds.refresh(Request())
else:
flow = InstalledAppFlow.from_client_secrets_file(CLIENT_SECRET_FILE, SCOPES)
creds = flow.run_local_server(port=0)
# Save the credentials for the next run
with open('token.pickle', 'wb') as token:
pickle.dump(creds, token)
creds = creds
self.service = build('people', 'v1', credentials=creds)
def get_all_contacts(self):
# Keep getting 1000 connections until the nextPageToken becomes None
connections_list = []
next_page_token = ''
while True:
if not (next_page_token is None):
# Call the People API
results = self.service.people().connections().list(
resourceName = 'people/me',
pageSize = 1000,
personFields = 'names,emailAddresses',
pageToken = next_page_token
).execute()
connections_list = connections_list + results.get('connections', [])
next_page_token = results.get('nextPageToken')
else:
break
return connections_list
def print_all_contacts(self):
connections_list = self.get_all_contacts()
if connections_list:
for i, person in enumerate(connections_list):
resource_name = person.get('resourceName', [])
names = person.get('names', [])
if names:
display_name = names[0].get('displayName')
else:
display_name = None
print('no.%s %s %s' % (i+1, display_name, resource_name))
else:
print('No connections found.')
def create_contact_body(self, contact):
given_name = contact[1]
middle_name = contact[2]
family_name = contact[3]
notes = contact[25]
email_work = contact[30]
email_home = contact[32]
phone_mobile = contact[34]
phone_work = contact[36]
phone_home = contact[38]
address_home = contact[40] # The unstructured value of the address
p_code_home = contact[45]
address_work = contact[50] # The unstructured value of the address
p_code_work = contact[55]
org_name = contact[58]
org_title = contact[60]
department = contact[61]
record_id = contact[65] # the user defined data, intended to be used for synchronization
modified_day = contact[66] # the user defined data, intended to be used for synchronization
contact_body = {
'names':[{'givenName':given_name, 'familyName':family_name, 'middleName':middle_name,}],
'emailAddresses':[{'value':email_work, 'type':'work'}, {'value':email_home, 'type':'home'}],
'phoneNumbers':[{'value':phone_mobile, 'type':'mobile'},
{'value':phone_home, 'type':'home'},
{'value':phone_work, 'type':'work'}],
'addresses':[{'streetAddress':address_home, 'postalCode':p_code_home, 'type':'home'},
{'streetAddress':address_work, 'postalCode':p_code_work, 'type':'work'}],
'organizations':[{'name':org_name, 'title':org_title}, {'department':department}],
'biographies':[{'value':notes}],
'userDefined':[{'key':record_id, 'value':modified_day}]
}
return contact_body
# Upload contacts one by one.
def add_contact(self, contact):
try:
contact_body = self.create_contact_body(contact)
new_contact = self.service.people().createContact(body=contact_body).execute()
print('Uploaded id:%s %s %s' % (contact[65], contact[1], contact[3]))
except IndexError:
print('Error id:%s %s %s contains input errors' % (contact[65], contact[1], contact[3]))
pass
def create_contact_group(self, group_name):
results = self.service.contactGroups().create(body={'contactGroup':{'name':group_name}}).execute()
group_id = results.get('resourceName', [])
return group_id
def delete_all_contacts(self):
group_id = self.create_contact_group('temp')
print('making a temporary group to delete...')
time.sleep(5)
print('waiting ...')
time.sleep(5)
connections = self.get_all_contacts()
if connections:
for i, person in enumerate(connections):
resource_name = person.get('resourceName', [])
add_group = self.service.contactGroups().members().modify(
resourceName = group_id,
body = {'resourceNamesToAdd':[resource_name]}).execute()
print(resource_name +' moved to the temporary group')
else:
print('No connections found.')
self.service.contactGroups().delete(resourceName=group_id,deleteContacts=True).execute()
print('All contacts have been deleted.')
def main():
read_contacts = ImportContacts()
contacts_list = read_contacts.read_contacts(CONTACT_CSV_FILE)
sync_contacts = QuickstartMod()
data = []
for contact in contacts_list:
data.append(sync_contacts.add_contact(contact))
#sync_contacts.delete_all_contacts()
if __name__ == '__main__':
main()
以下のページにAPIの仕様がまとまっているので開発の上で役に立つかと思います。

続き

2020/06/19

【Python】Google People API でGoogle連絡先を取得する


Google連絡先の取得、追加、削除などを行うにはGoogle Contacts APIGoolge People APIが利用できます。
しかし、Contacts APIは、People APIに置き換わっていくそうなので、これからGoogle連絡先と連携するアプリケーションを作成する際はPeople APIの方を用いると良いかも知れません。
個人的な経験ですが、G SuiteのGoogle連絡先を更新する時Contacts APIでは上手く行きませんでしたが、People APIでは更新できました。ですが、今のところ、People APIではContacts APIの機能を全て互換出来ている訳ではない様です…

PythonからPeople APIを使う

Google People APIをPythonから使うためのサンプルコードとしては、公式ドキュメントに記載してあるPython Quickstartがあります。

本サイトでは、会社のデータベースや年賀状作成ソフトから出力した住所録のcsvをGoogle連絡先に同期させることを目標として、プログラムを作成しようと思います。
本記事では、Python Quickstart内のquickstart.pyを元にGoogle連絡先のデータを取得・表示するコードを作成したものを公開します。

People APIの有効化と必要なライブラリのインストール

まずは、Python Quickstartの内容に従って、サンプルコードquickstart.pyが動く状態にします。
下記のコードでは、ここでダウンロードしたcredentials.jsonをそのまま利用します。
また、People APIは、現時点ではPython 2.6以上に対応していますが、Python 2系統はサポートが終了し、Python 3系への移行が推奨されることから、
本サイト記載のコードは、Python 3系環境で実行することを想定しています。

問題点:people.connections.listのpageSizeの上限

公式ドキュメントによると、記事作成時(2019.06.19)時点では、pageSizeは1~1000の間しか設定出来ない様です。(少し前まで上限は2000だった様な…?)
この上限を超える件数の連絡先を取得したい場合は、nextPageTokenを利用すると良い様です。


作成したコード

必要なファイル:credentials.json

import pickle
import os.path
from googleapiclient.discovery import build
from google_auth_oauthlib.flow import InstalledAppFlow
from google.auth.transport.requests import Request
# If modifying these scopes, delete the file token.pickle.
SCOPES = ['https://www.googleapis.com/auth/contacts']
CLIENT_SECRET_FILE = 'credentials.json'
class QuickstartMod(object):
def __init__(self):
creds = None
# The file token.pickle stores the user's access and refresh tokens, and is
# created automatically when the authorization flow completes for the first time.
if os.path.exists('token.pickle'):
with open('token.pickle', 'rb') as token:
creds = pickle.load(token)
# If there are no (valid) credentials available, let the user log in.
if not creds or not creds.valid:
if creds and creds.expired and creds.refresh_token:
creds.refresh(Request())
else:
flow = InstalledAppFlow.from_client_secrets_file(CLIENT_SECRET_FILE, SCOPES)
creds = flow.run_local_server(port=0)
# Save the credentials for the next run
with open('token.pickle', 'wb') as token:
pickle.dump(creds, token)
creds = creds
self.service = build('people', 'v1', credentials=creds)
def get_all_contacts(self):
# Keep getting 1000 connections until the nextPageToken becomes None
connections_list = []
next_page_token = ''
while True:
if not (next_page_token is None):
# Call the People API
results = self.service.people().connections().list(
resourceName = 'people/me',
pageSize = 1000,
personFields = 'names,emailAddresses',
pageToken = next_page_token
).execute()
connections_list = connections_list + results.get('connections', [])
next_page_token = results.get('nextPageToken')
else:
break
return connections_list
def print_all_contacts(self):
connections_list = self.get_all_contacts()
if connections_list:
for i, person in enumerate(connections_list):
resource_name = person.get('resourceName', [])
names = person.get('names', [])
if names:
display_name = names[0].get('displayName')
else:
display_name = None
print('no.%s %s %s' % (i+1, display_name, resource_name))
else:
print('No connections found.')
def main():
sync_contacts = QuickstartMod()
sync_contacts.print_all_contacts()
if __name__ == '__main__':
main()
以下のページにAPIの仕様がまとまっているので開発の上で役に立つかと思います。

続き

2020/03/03

【3.2万円PC】ThinkCentre M75q-1 Tinyを購入しました


一部界隈で話題な3.2万円で買える第三世代Ryzen5搭載の小型PC、ThinkCentre M75q-1 Tinyを購入しました。n番煎じなので、特に購入方法などは記載しませんが、納期や使用感などについて残しておこうと思います。

注文から到着まで


納期


注文日:2020/01/31
到着日:2020/02/28
と注文から発送まで約3週間、発送から到着まで約1週間と一ヶ月ほどかかりました。
新型コロナウィルスの影響のせいもあるかと思いますが、すぐ欲しいという人向けではないですね。

購入価格


以前のモデルを、職場で使用したことがあり、サイズ感や静音性などが気に入っていました。
今回は自分のお財布での購入なのでケチった構成です。
購入内容は以下の通り、最安構成のカスタマイズです。

製品名 価格 合計
ThinkCentre M75q-1 Tiny:価格.com限定 パフォーマンス
・AMD Ryzen 5 Pro 3400GE (3.30GHz, 2MB)
・8GB PC4-21300 SODIMM
・1TB ハードディスクドライブ, 7200rpm 2.5インチ 7mm
¥29,200 ¥29,200
Lenovo USB Type-C - スリムチップアダプター ¥1,875 ¥1,875
小計 ¥31,075
税金 ¥3,107
送料 ¥0
合計 ¥34,182

また、一部サイトで紹介のある通り、楽天のRebateを通して購入したので、5%のポイント還元をゲットしました。
34,182円-1,709ポイント=実質32,473円での購入になりました。
時期によっては、10%還元なども行っているようなので、購入時期次第では更にお得に購入出来そうです。

数日使った感想としては、Wi-Fi/Bluetoothモジュールは追加しておいても良かったかもと若干後悔していますが、今のところはなしでも事足りています。

購入後のカスタマイズ


注意:保証対象外になる可能性もあるので自己責任で実施してください。


SSDへの換装


ケース裏側の蓋を開けると、M.2スロットがあるので、以前購入したSSDを差してWindows10をクリーンインストールしました。
元々ついていた1TBのHDDはデータ用のDドライブに変更しました。
CrystalDiskMarkでの速度の計測結果の比較は以下の通りです。
HDD SSD換装後

当然ですが、かなり高速になり、OSの起動速度などの使用感も良くなりました。
マザーボードがPCIe 4.0対応でない様で、Raed速度は3500MB/s程度ですが、実用上十分だと思います。

注文時の公式カスタマイズだと、SSDの変更の料金は以下の通り。

512GBのM.2 SSDへの変更で+41,800円かかりますが、今回、追加したCSSD-M2B5GPG3VNF(500GB)は15,000円程度で購入したので、約27,000円節約できました。
本体が3.2万円であることを考えるとこの差は大きいです。
1TBのM.2 SSDに変更したい場合、例えばCSSD-M2B1TPG3VNF(1TB)は、実売価格20,000円程度なので、60,000円程度節約できます。
M.2 SSDの追加はかなり簡単なので、自分でのカスタマイズがかなりお得感があり、満足度が高いのではないでしょうか。


メモリの増設


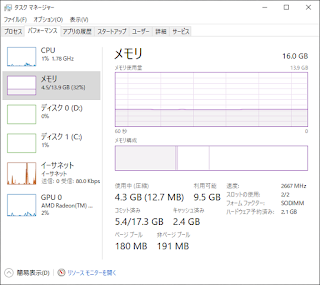
ケース裏側の蓋を開けるとメモリスロットは二つあり、注文時は、DDR4 8GBメモリ×1枚を選択したので、もう一枚メモリが追加できる状態。
カスタマイズ時には、PC4-21300(DDR4-2666) SODIMM 8GBとなっていましたが、なぜかMicron製のPC4-25600(DDR4-3200) SODIMM 8GBが搭載されていました。

同一規格が良かろうと思い、以下の商品を注文しました。


こちらのメモリも製造元はMicronですが、Crucialのブランドで販売されています。
購入時点でのヨドバシ.comの販売価格は5,240円(10%ポイント還元)でしたが、ポイントが余っていたので全額ポイントで購入しました。
元々ついていたのが、PC4-25600(DDR4-3200)メモリだったので、同規格のメモリを追加購入しましたが、
Ryzen 5 Pro 3400GEの対応規格がPC4-23400(DDR4-2933)までで、Lenovoでの標準がPC4-21300(DDR4-2666)なので、PC4-21300(DDR4-2666)の追加でも問題ないかと思います。

メモリの増設も差し込むだけなので、かなり簡単に完了しました。

注文時の公式カスタマイズだと、メモリの変更の料金は以下の通り。
8GB×1枚から8GB×2枚への変更で、+13,200円かかりますが、メモリ価格が5000円程度であることを考えると、約8,000円節約できました。
M.2 SSDの追加同様簡単なので、おすすめです。


2020/01/11

【Python】バリオグラムマップを計算する

以前の記事では、等方性(isotropy)バリオグラムをPythonで計算するプログラムを書きましたが、今回は、異方性 (anisotropy)を考慮したバリオグラムを計算し、バリオグラムマップを描画するプログラムを書きました。

空間自己相関が方向によって変化する時、データには異方性がある状態です。この場合、バリオグラムは距離のみの関数でなく、距離と方向の関数となります。
今回のプログラムでは、複素数を使って、データ間の距離と方向を求め、異方性バリオグラムを計算しました。
バリオグラムマップでは、異方性を直感的に表示することができます。

# coding:utf-8
import numpy as np
from scipy.interpolate import griddata
import matplotlib.pyplot as plt
from matplotlib.widgets import Slider
# 元データを読み込み、配列に格納する
s_array = np.genfromtxt('source.csv', delimiter=',', skip_header=1)
# 異方性セミバリオグラム
def aniso_variogram(xyv_array):
# 複素平面を用いる
xy_array = xyv_array[:, 0] + xyv_array[:, 1] * 1j
v_array = xyv_array[:, 2]
xy_array = np.tile(xy_array, (len(xy_array), 1))
v_array = np.tile(v_array, (len(v_array), 1))
# 方位、距離、バリオグラムを求める
theta = np.angle(xy_array - xy_array.T)
radii = abs(xy_array - xy_array.T)
vario = abs(v_array - v_array.T)**2 / 2
return theta, radii, vario
# バリオグラムマップ
def variogram_map(theta, radii, vario, grid_num):
# 座標変換
x = radii * np.cos(theta)
y = radii * np.sin(theta)
z = vario.reshape(-1)
# グリッドで分割し、補間する
xgrid = ygrid = np.linspace(-np.amax(radii), np.amax(radii), grid_num)
xgrid, ygrid = np.meshgrid(xgrid, ygrid)
th = np.arctan2(ygrid, xgrid)
ra = np.sqrt(xgrid**2 + ygrid**2)
va = griddata((x.reshape(-1), y.reshape(-1)), z, (xgrid, ygrid), method='linear', fill_value=0)
return th, ra, va
theta, radii, vario = aniso_variogram(s_array)
gr_th, gr_ra, gr_va = variogram_map(theta, radii, vario, 100)
# グラフを作成
fig = plt.figure()
ax = plt.subplot(111, projection='polar')
plt.subplots_adjust(top=0.82, bottom=0.18)
ctf = ax.pcolormesh(gr_th, gr_ra, gr_va, cmap='jet')
# タイトルを設定
plt.text(0.5, 1.15, 'Semivariogram Map', horizontalalignment='center', transform=ax.transAxes, fontsize=16)
# グリッドを設定
ax.grid(True)
ax.set_rmax(np.amax(radii))
# カラーバーを設定
plt.colorbar(ctf, orientation='vertical', cax=plt.axes([0.85, 0.18, 0.02, 0.64]))
# Sliderを設定
c_slider = Slider(plt.axes([0.3, 0.01, 0.45, 0.03]), 'Color-Max', 0, np.amax(gr_va), valinit=np.amax(gr_va))
r_slider = Slider(plt.axes([0.3, 0.06, 0.45, 0.03]), 'Radius-Max', 0, np.amax(radii), valinit=np.amax(radii))
def slider_update(val):
ctf.set_clim(0, c_slider.val)
ax.set_rmax(r_slider.val)
fig.canvas.draw_idle()
# Slider値変更時の処理の呼び出し
c_slider.on_changed(slider_update)
r_slider.on_changed(slider_update)
# グラフを表示
plt.show()
view raw vario_map.py hosted with ❤ by GitHub

デモファイルに対する実行結果